Hello everyone, in this article you will find a list of things to keep in mind while making Arma 3 missions. Let’s get started.
1. Create ancillary files
The first thing you should do after opening up the editor is save your mission. Then you should create 4 files. You need a description.ext, init.sqf, initPlayerLocal.sqf, and initServer.sqf . Your mission folder should look like it does below:
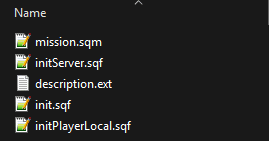
To create the files just make a new text document and change the filename along with the extension to what is needed. The mission.sqm is created by the Eden editor. It will be difficult to make a good mission without having these files. The initServer.sqf and initPlayerLocal.sqf relate to multiplayer scenarios so if wanted, you can remove them if doing singleplayer (or you can keep them, it will still work).
2. Use a code editor and GitHub
I highly recommend anyone making an Arma 3 mission to download a code editor. It can be Notepad++, SublimeText, or any other editor but I would personally vouch for Visual Studio Code. With Visual Studio Code you can install extensions like Arma 3 CfgFunctions and Arma Dev to make writing SQF files easier. You can use the included file explorer to jump between the text files with ease. There are many benefits to using a code editor like VS Code. For example, when I encounter an error while testing my mission, I can just pause the game (if singleplayer), navigate to the file with the error, and then quickly write a solution. I probably spend 80% of my time making Arma missions inside of VS Code. Just try it for yourself, I promise there will be results.
Beyond a code editor, you should also utilize GitHub to create a repository of your mission folder. This will track changes you make and allow you to roll back to earlier mission versions if needed. This is essential if your mission is getting too large or complex. There are plenty of tutorials on YouTube that will explain how to setup GitHub. In our case, there is nothing specific that needs to be done. You just have to download the GitHub repositories extension for VS Code and set your mission folder (or move your mission folder inside a parent folder) as the repository folder.
3. Learn how to use remoteExec
If you want to make missions with scripts more complicated than a simple deleteVehicle on trigger activation, you need to learn remoteExec. Like really learn it too. If you are making a multiplayer mission then a good chunk of the commands you use will need to be nested inside remoteExec. Let’s imagine a scenario, you want a character to speak to the players over the radio on mission start. The command would look like this:
playSound "hqRadio_1";We placed this playSound in the init.sqf. The playSound will run multiple times and stack on top of each other for the number of players (and for the dedicated client) in the session. This is bad. Furthermore if a player joined while the mission was in progress it would play again. But if you put that code piece somewhere that is only executed on one machine, like a trigger set to server only, then only the server will hear the sound. To get around that, you must use remoteExec:
["hqRadio_1"] remoteExec ["playSound", 0]; // 0 = Everybody gets it (even the dedicated server)This is much better for a command with a local effect (like playSound) and should be used almost every time you want a local command effect on every player. Be mindful not to remoteExec a command with a global effect or it will be duplicated on top of each other. I will go over remoteExec more in its own post.
4. Use the layer feature in the Eden Editor
Maybe I am the only weirdo that did not know the Eden Editor had a layer system… but I hope not or I am just preaching to the choir. Imagine you intricately created a city block in the editor from scratch. Buildings, sidewalks, grafitti textures, and flower pots all placed down by hand. Now you have to place units and vehicles in that perfect spot down to the picometer. While attempting this, you accidentally select all your aesthetic AF clutter objects and move them. Now you have to hit the undo button. You try again but this time you accidentally move the house your unit is supposed to be hiding in. Now you have to hit the undo button. Rinse and repeat this for the entire time you are working in your city block. Infuriating. What you can do instead is after placing down all the objects, select them and create a new layer (located bottom left of the editor screen).

Then double click on the layer name to edit its properties and uncheck the enable Transformations property. You’ll see the objects in your layer have invisible icons and now you cannot move them by accident. If you want to edit them, all you have to do is recheck the transformations property. Layers are also helpful if you want to influence a large amount of entities at the same time. For instance, if you wanted to create a Laws of War DLC time effect where you go forward and backward in time and the scene changes state. All you have to do is create two layers (each layer being a scene state) and then you can hide and show them at your own will.
// Hide all future state objects and show past state objects
(getMissionLayerEntities "futureStateObjects" select 0) apply { _x hideObjectGlobal true; };

(getMissionLayerEntities "pastStateObjects" select 0) apply { _x hideObjectGlobal false; };
// "futureStateObjects" & "pastStateObjects" are the layer names
Seriously, give the layer feature a try.
5. Make the player respawn with their loadout on death
For multiplayer, I would highly recommend making the player respawn with the gear they had on death.
Why?
Because its not fun spawning as Kerry when you are supposed to be a super tricked out ODST!
To do this you want to access your initPlayerLocal.sqf (the same one I mentioned earlier) and paste the following code:
player addEventHandler ["Killed", { player setVariable ["TAG_DeathLoadout", getUnitLoadout player]; }];

player addEventHandler ["Respawn", { private _loadout = player getVariable "TAG_DeathLoadout"; if (!isNil "_loadout") then { player setUnitLoadout _loadout; }; }];
You will need a description.ext in order for it to work.
6. When making the briefing use an SQF file not the module
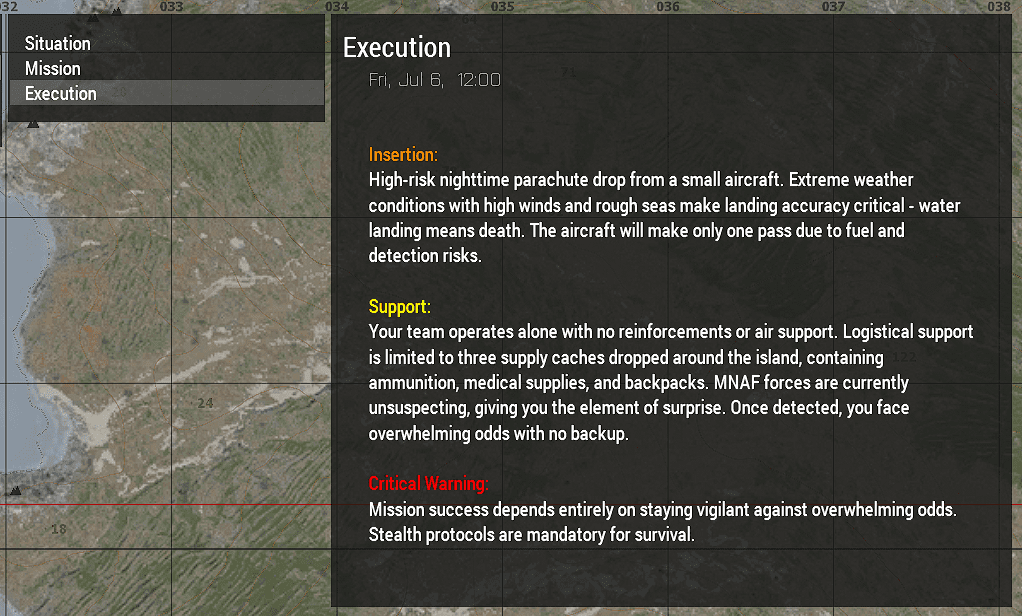
A simple approach to making a mission briefing is to use the Create Diary Record module in the editor. However, I would recommend not going that route. This is more of a personal preference but as someone with a dual monitor setup I prefer to do as much text or code based editing outside of the eden editor and inside of a code editor. It is hard to properly visualize and format the briefing text in the small window provided by the Eden module. Just compare the two images below:
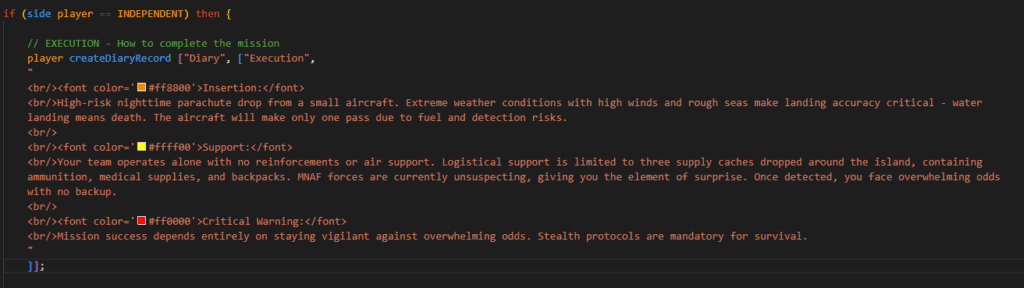
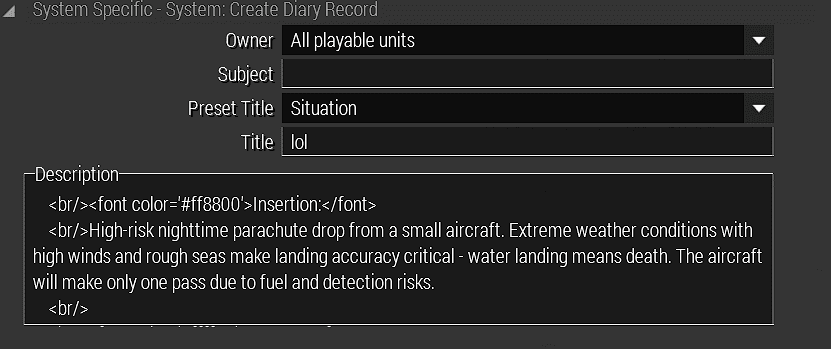
Keep in mind both the top and bottom image will result in the briefing shown at the start of this segment, but the code editor neatly shows the entire diary record while the module only shows the first paragraph.
To start writing a briefing in a SQF file you have to navigate to your mission folder and create a briefing.sqf file. Alternatively, you can write your briefing diary records inside of any SQF environment that gets executed on mission start like init.sqf and initPlayerLocal.sqf. The main command to write a briefing is createDiaryRecord and it has a pretty straightforward syntax:
player createDiaryRecord ["Diary", ["Execution", "text"]];A longer example would look like this:
player createDiaryRecord ["Diary", ["Execution",
"
<br/><font color='#ff8800'>Insertion:</font>
<br/>High-risk nighttime parachute drop from a small aircraft. Extreme weather conditions with high winds and rough seas make landing accuracy critical - water landing means death. The aircraft will make only one pass due to fuel and detection risks.
"
]];
In order to create a line break in your diary record you must do <br/> , hitting enter in the code editor will not add a line break! I will include an example briefing.sqf in the download section of this post.
Conclusion
That is all for right now folks. This is just part one as I have so many other tips to share but I also want to keep these posts concise. Feel free to comment down below if you have any questions, suggestions, or even corrections.